Pages

Wednesday, August 8, 2012

Starbucks Chocolate Hazelnut Tart Copycat Recipe


I have only just recently discovered the dangerously addictive crack that is Nutella.  How I committed such an atrocious sin in the sweet treat world is beyond me.  Actually, no, I take that back.  I DO know how I took so long to experience its hazelnutty goodness:  I knew once I started, I would not be able to stop.  And I was right.  Truth be told, I am an addict...and I am not ashamed to admit it...much.  My BFF is also a Nutella addict, probably more so than myself, so when she discovered the new chocolate hazelnut tarts at Starbucks, she was over the moon about it's tastiness and promptly shot me a text to let me know about her new discovery.  Yes, we are total sweet treat enablers.  What about it?  Anyhow, I made sure to pick one up during their 2 for $2 sale and once I tasted it I let BFF know that I was fairly certain I could make a replica of the tart and basically reaffirmed why I am pretty much the best friggin' BFF on the planet.  Truth.


I knew going into tasting one of the tarts that the star ingredient was going to be Nutella, or at least a filling thrown together that tasted similar to Nutella.  I mean, this is why my BFF was so excited about the treats to begin with, because it tasted like it was stuffed with hazelnut chocolate crack.  My main task was to taste and figure out what the tart crust was made up of.  I figured it was likely one of two things: either a shortbread or a pastry crust, and shortbread was the taste test winner in the end.  And once I figured out that the two main components were dang deliciously simple ones, I got to work asap in making a tart for bestie that would blow her skirt up AND save her money at the same time, because when you're as obsessed with Tiffany & Co. crap as she is, every penny saved counts.  :oP

Ok, so this recipe is ridiculously easy to make an even more ridiculously easy to devour.  The ingredient list is pretty short and the process is simple.  So, let's begin.

Chocolate Hazelnut Tarts (Starbucks Copycat Recipe)
(makes 1 dozen)

Ingredients
1c. butter, cold
1/2c. confectioner's sugar
2c. unbleached flour
1/4. baking powder
Nutella
Semi-sweet chocolate chips

Directions
Preheat oven to 350 degrees F.

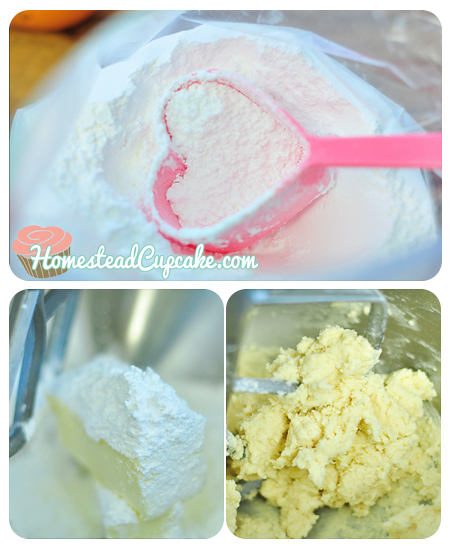
Cream butter, confectioners sugar and baking powder until light and fluffy.  Add the flour and mix until just combined.  Do not over mix or the dough will get too warm and soft.  


Once all of the ingredients are combined, transfer the dough onto a lightly floured surface.  You want to pat the dough down and roll it out to 1/4" thick.  The thickness, or lack there of, is an important part of making these tarts.  You want the right amount of shortbread sandwiching the delicious filling otherwise, if it's too thick, it will take away from the inside chocolatey goodness and if it's too thin, the dough will crack open and fail at containing the filling inside the middle of the tart.  And biting into a buttery tart with a nice, thick layer of Nutella is pretty much the heavenly point of putting the effort into making these to begin with.  


If you're not used to working with a shortbread dough or are having trouble with it sticking, you can wrap it in some saran wrap or put it in a ziploc bag and throw it in the fridge for a short while to get it cold enough to work with, minus the annoying sticking.  Once you've rolled out all of the dough to the proper thickness, use a simple round biscuit cutter to make perfect circles.  When I took pictures of my process making these tarts, I couldn't find my round cutter so I used a heart shaped cookie cutter instead.  But since then I found the biscuit cutter and use that one whenever I make these.  The hearts are cuter for sure, but the circle ones come together better.  If you want to be super authentic you can find a rectangular cutter, but sadly I'm not one of the cool kids on the block with one of those.  I haven't been able to find one in the stores for the life of me.  But I won't be sad about it.  Instead I say "Eff you, damn elitist, hard to find, rectangular cutter!  I don't need you anyways.  Me and my biscuit cutter are the shit!"


Once you've gotten all of your circles cut into the dough, you want to transfer half of them onto a cookie sheet lined with parchment paper.  Then this is where the deliciousness really happens.  You want to spoon a good tablespoon of Nutella in the middle of each shortbread square on your cookie sheet.  Then you want to place another shortbread circle on top of the Nutella covered shortbread circle.  So essentially you're making a chocolate hazelnut crack sammich!  One thing you can do to help the tarts press together better is to lay the top piece of dough into the palm of your hand and press down in the middle a little bit, that way when you lay the top layer onto the Nutella piece, you've created a small crease for the Nutella to smoosh into.  This prevents it from smooshing out of the sides of the shortbread when you're pressing it together.


I use my finger tips to push the two layers of dough together at the edges.  You could also use a fork, but I've found that when I push the fork into the dough, a lot of it tends to stick into the middle of the fork prongs, and that's just friggin' annoying and ticks me off.  And I'm short tempered and curse easily as it is, damn it, so the last thing I need is something like shortbread pissing me off.


Once all of your crack tarts are pressed together, bake them in the oven for 12-15 minutes.  You want the edges and bottoms of the tarts to get to a nice, golden brown but you don't want to over bake.  I have found that I bake my tarts for 14 minutes and that seems to come out at the perfect buttery, crispness.  It's a texture that is delicate and flakey and just crumbles into your mouth when you bite into it.  

After you pull your tarts from the oven you want to place them on a rack to cool completely.  And once they're properly cooled you can drizzle some melted chocolate chips on top for the finishing touch.  You don't need that much chocolate to do the drizzle, so what I do is just put a small amount of semi-sweet chips into a baggie and warm them in the microwave until they're properly melted then I cut a small hole at the edge of the baggie, drizzle my chocolate and then just toss the entire baggie when I'm done.  Super easy and zero clean up.  :)  


I seriously adore these tarts.  Far too much than I probably should.  They're dangerously addictive, and to be honest, I'd say they're even tastier than the originals.  Not to mention less expensive.  So if you're a Nutella addict like my BFF and I are, give these bad boys a try.  You won't regret it.  Or you will, when you find yourself standing on your scale, covered in shortbread crumbs and cursing the increasing numbers.  Not that I'm speaking from experience or anything.  Ahem.


Wednesday, July 25, 2012

D.I.Y. Apple Cinnamon Instant Oatmeal Packs


I love oatmeal.  My husband loves oatmeal.  My kids love oatmeal.  My pocketbook...does NOT love oatmeal.  At least not the pre-packaged, single serving type.  With two older kids and myself alone, we could easily go through a box of the Quaker oaty goodness within a couple days, so the cost can add up.  And I am the queen of the saying "Every little bit makes a difference...(and makes me feel less guilty for dropping the $4.25 for my occasional Starbucks fix) ".  Plus I like to have control over my family's food as much as possible, so this recipe is another quick, easy and tasty little money saver that I frequently use and hope you will begin to use as well.  And the best part?  The ingredient list is small, simple and deliciously customizable, so how could anyone complain? 

Apple Cinnamon Instant Oatmeal   (Print Recipe)
(makes one single serving)

Ingredients
1/3 c. instant oatmeal
2 tbsp. chopped dehydrated apple slices
1/2 tbsp. brown sugar
1/2 tbsp. granulated sugar
1/4 tsp. cinnamon
1/8 tsp. salt


In a snack sized ziploc bag, add all the dry ingredients.  Roughly chop a couple dehydrated apple rings and throw them into the bag.  I get mine in the loose bulk section at WinCo for pennies, but you can also find them at pretty much any grocery store these days.  Seal shut and shake shake shake until everything is well combined.  Store in a dry, cool place until you're ready to cook it.  Seriously, it's that easy.


Cooking Instructions
Dump the entire contents from one ziploc bag into a microwave safe bowl.  Add 2/3-1 cup of water, depending on how thick you like your oatmeal.  Cook in the microwave on high for 2 minutes and 25 seconds.  That's it, that's all you do, and you have delicious, healthy, apple cinnamon oatmeal.  I use just the 2/3 cups of water because I like to add a little milk after the oatmeal has cooked to help cool it off as well as give it a nice, creamy texture.  But it's all a matter of personal choice.


I make my oatmeal packets in large batches and then store all of the individual ziplocs in a little basket in my pantry.  Then when I want to cook some up, I just grab how many packets I need, throw it in a bowl, add the water, toss it in the microwave and in two minutes I have breakfast...or lunch...or a snack.  You get the point.  These packs are also perfect to take into work with you to keep in your drawer to have in case you're in a rush and forget breakfast one morning.  I also have a few packets of these in my "emergency bag" in my car for an easy, just in case meal.  I can't say enough about how easy and yummy these are.  And they literally cost pennies compared to what you pay for the individual boxed ones you get in the store.  It's a win, win!  

Oh!  And as I'd mentioned before, this is a fabulous base recipe for many instant oatmeal flavors.  Sometimes I will omit the apple rings and substitute them with chopped walnuts then right before cooking throw in a little bit of chopped up banana and get a delicious banana nut oatmeal.  It's just as amazing, just as easy and just as big a money saver.  Be creative.  I'm sure there are about a bajillion flavor combos you can come up with.


Tuesday, July 24, 2012

Butterscotch Lactation Cookies


Lactation cookies have been a lifeline for me...three times now.  Breastfeeding has never come absolutely easy for me, but I've come across methods of helping me out in my breastfeeding relationships that ARE easy.  And one of those methods is throwing together some beneficial, and also tasty, lactation cookies.  I've tried many mama milk cookie recipes throughout the years but never found one I really liked.  A majority of them made me barfy and also irritated that I put the time and effort into baking a batch of cookies that just ended up tasting like stale ass with a chocolate chip on top.  And I'm all for a piece of ass, just not a stale one.  Then I threw together this recipe, and the clouds immediately parted and the heavens rejoiced...and then my boobs sprouted a much needed leak.  True story.

If you've tried every lactation cookie recipe under the sun and are convinced that they're all gross and grainy and too tasteless to suffer through eating, please give this recipe a try and then re-evaluate your stance on lactation cookies.  I love these cookies.  My kids love these cookies.  My boobs love these cookies.  Though my 7 year old daughter was sorely disappointed recently when, to her dismay, after eating these cookies for a week straight she still hadn't produced any breastmilk and was convinced the recipe was crap and did not work.  I had to break it to her gently that even though they're cookies meant to produce more milk, they could only do so if you'd just had a baby and were currently nursing it.  She was not happy...but still enjoys the cookies anyway.
There are a lot of ingredients in these cookies, I won't lie.  But it's for a reason.  These ingredients, in combination, are what help your body produce more milk.  The brewer's yeast has been known for a long time to increase milk supply as well as increase a mother's energy in general as it's packed with B vitamins.  Flax is also said to increase supply while also giving a mother better digestive health.  The oatmeal is also a great milk boosting ingredient because it is packed with iron and healthy nutritional energy that nursing mothers need.  It is very common for breastfeeding moms to become iron deficient from the frequent nursing since babies leech the iron from their mother, so it's always a good thing to include a lot of iron rich foods in your diet along with the oatmeal. I eat between 2-4 of these cookies a day, and I see a 2-3 ounce milk increase per pump session within a couple days.  Seriously.  OH!  And there is no protein powder in these cookies.  In the above picture, there is a plastic tub of Nectar protein powder.  But if you notice right above the label it says Whole Wheat?  It is a fabulous container that can be reused for things like wheat flour storage, bread flour storage, etc. so that's why that is included in the picture, just to clear up any confusion.  :)

Butterscotch Lactation Cookies   (Print Recipe)
(makes approx. 3 dozen)

Ingredients
1 1/2 c. whole wheat flour
1 3/4 c. rolled oats (not the quick cooking kind!)
1 tsp. baking soda
1 tsp. salt
3/4 c. crunchy peanut butter
1/2 c. unsalted butter, softened
1 c. finely ground flax seed (the finer the flax is ground, the smoother the cookie texture will be)
3 tbsp. brewer's yeast (you can get this inexpensively at your local Sprouts)
1/3 c. water
1 1/2 tsp. cinnamon
1/2 c. sugar
1/2 c. brown sugar
1 tbsp. pure vanilla extract
2 large eggs
1 bag milk chocolate chips
1 bag butterscotch chips

Directions
Preheat oven to 350 degrees F.

Combine flour, baking soda, cinnamon and salt.  Set to the side.

In a large bowl add peanut butter, butter, sugar, brown sugar, vanilla, brewer's yeast, flax and water.  You want to beat this mixture together until it is light and creamy.  Now let me tell you about a nifty little measuring cup that I ordered at a party over ten years ago and still use regularly to this day.  It's a Pampered Chef Measure-All® Cup and it is wonderful.  I paid a mere $10 for it and I cannot say enough good things about it.  It's been beaten up, dropped, thrown, microwaved, frozen, put in the dishwasher, etc. and it's still like new and one of my kitchenware best friends, especially when working with sticky substances like peanut butter.  Any time I have a recipe that calls for some creamy, peanuty goodness, I reach for this measure cup.  All I have to do is set the inside cup thing to the line for the amount I need and then scoop the peanut butter into the cup until it is flush with the top.  Then all you have to do is hold it over your mixer, push the little inside cup up and out pops a perfectly formed hunk of peanut butter that you have to just slide off into your bowl with a spatula.  No digging it out of a cup and getting peanut butter everywhere.  It's just a scoop, plop and done.  LOVE it.  Get one.  You're welcome.
Once you've creamed your ingredients, add in the eggs and beat until combined.
Gradually add in the flour mixture until well combined.
Add the bag of chocolate chips and the bag of butterscotch chips, and remind yourself that all of the sugary deliciousness in these cookies is for the greater good of both yourself and your baby.  It's of utter necessity.
Add the oats to the cookie mixture in small amounts at a time and beat until just combined.  Then roll out even balls of dough and place them on a parchment lined cookie sheet.  After the balls of dough are lined on the cookie sheet, press each one down with a fork like you would peanut butter cookies.  This helps flatten them out so that they cook more evenly.

Bake at 350 degrees F for 14-16 minutes.

I personally like these cookies on the crispier side.  They're perfect when the outside is lightly crispy and the inside still has a slight softness to it.  These really aren't the kind of cookies that are tasty when they're underdone or doughy.  When you bake them for the right amount of time, the butterscotch chips get a delicious caramelized texture and the chocolate chips accompany it perfectly. When the cookies are done, remove them from the oven and allow them to cool completely before putting them in a container.  Or grab one warm and dig in immediately, because let's face it, who can resist melty chocolate inside a fresh-from-the-oven cookie?


Tuesday, July 17, 2012

Grinding your own beef (minus the pink slime) and tips on stocking up inexpensively

We've been grinding our own meat to make homemade ground beef here in the Cupcake household going on two years now, long before the disgusting revelation of Pink Slime came about, most recently covered by ABC News exposing that "70 percent of ground beef sold in U.S. supermarkets contained the product." So for us, not getting all the weird ground up tidbits and chemicals in our meat that you would find in the store bought variety is really just a nice bonus.  Our main purpose for grinding our own meat when we first began doing so was to save money, plus you get a better quality ground beef that would normally cost a lot more at the local market.  The way we stock up and grind our beef gives us a wonderful, pure ground chuck and at just a sliver of the going rate.   I know the idea of stocking up on meat in large quantities and grinding a large portion of it may seem like a hassle, but the amount of time you do put into doing so is WELL worth the investment in time and effort.

The first step in stocking up on meat is making your purchases at peak sale times when you can get the best quality meat at the lowest prices.  I like to stock up my household quarterly, so four times a year, which gives me 3 months worth of meat for meals.  My two main proteins that I stock up on are beef and chicken. So I always have my eyes open going through the local grocery store ads that come out weekly.  When you watch how the sales in stores go for a while, you'll begin to learn when and what things go on sale, depending on the time of year, holidays approaching, etc. You will also learn which stores have the best sales on which meats. Our local Superior Foods usually has the best sale prices on chicken and pork, but especially chicken.  It's pretty frequent that they have good chicken sales.  Winco Foods, the place that makes it possible for me to live a life where I can cook most of our meals from scratch due to their amazing bulk foods section, usually discounts their meat on Thursday mornings.  So go early and look for the little yellow stickers to get your best steals.  Many times I have stocked up on package after package of chicken thighs or legs that were discounted to a mere dollar or two due to overstocking for preparation for an upcoming holiday.
This time around, with Independence day as the holiday that was going to be happening (which has now passed) it was a perfect time for meat to be on sale.  Which worked out perfect because we had reached our quarterly time for stocking up and were running low.  There was an amazing sale happening for boneless, skinless chicken thighs and it was going for just $0.99/lb with no limit on poundage.  SCORE!  But then the same store was also advertising their boneless beef chuck steaks at $2.27/lb, which is also a very good price for boneless chuck in our area.  It usually goes for $3.99/lb or more on a good day. So hubbs and I did not hesitate for a second, got the three kids loaded into the car, and headed to the store with our usual game plan in mind: Stock up on gallon size freezer bags and prepare to ask the butcher for the whole beef cuts from the back rather than the smaller portioned meat. This is the easiest way to buy the large quantities of beef for grinding without having to build up so much waste from buying package after package of one-meal sized roasts. So you want to make sure to be friendly with your local butcher, because he IS your friend when it comes to stocking up, and he can clue you in on upcoming sales as well as hook you up with the best cuts of meat from the back. Ya dig? So word to the wise, talk to the butcher right away and nicely ask for the whole hunks of meat from the back when you are ready to buy. On this past stock-up trip, we purchased three giant sides of the boneless chuck to grind (about 45 pounds worth) and 80 pounds of boneless, skinless chicken thighs.  Our cart was literally FULL of meat.  People were looking at us like we were crazy.  DUH!  That's what makes us special.  ;oP
Alrighty, so the way we handle the copious amounts of meat for stocking up is buy a few boxes of the Ziploc freezer bags, bust out my Kitchen Aid mixer, attach the Food Grinder Attachment (which is worth EVERY penny), set out my food scale (because I'm THAT anal about measuring my meals out to be as even as possible) and create a work line with my hubby.  We bought a Kitchen Aid ceramic knife to cut the large hunk of meat into smaller, grindable sizes and I have nothing but praise for it.  It's like cutting through butter, it works THAT good. So hubbs takes the time to cut up the large hunks of beef into a big pile of manageable pieces and then as he runs the meat through the grinder, I scoop out the ground beef and spoon it into the gallon sized freezer bags and then plop them on the scale to make sure I'm putting in the right amount.  Each meal size for us is 1 1/2lbs of ground beef. So I fill the bags, weigh them, and then toss them to the side on the counter.  We keep this process going together until all the meat is ground up. We usually have the radio on and spend the time talking and laughing, and honestly, the time flies by and also acts as another reason for us to spend time with one another and keep our relationship strong.
Once we've ground up all the meat and thrown it into bags, we smash the meat down into flat discs in the Ziploc to where it takes up about half of the bag, then we pull out the air, seal it and fold the other half of the bag over and move on to the next bag.  Pressing down the meat into flat discs not only makes storage much easier in the freezer but it also makes it much faster and even for defrosting purposes. I've been using the flat, disc method for years and years and my freezer and sanity thanks me for it.  With the 45 pounds of ground chuck that was a mere $102.15, we were able to get 30 meal sized portions (1 1/2 lbs) of pure, boneless ground chuck beef out of it at just $3.40. And that is an amazing price for freshly ground BONELESS CHUCK that has NO PINK SLIME or any other additives or chemicals to be found.  And the flavor and quality of this meat is far superior than anything you would find pre-ground in the store. There is no where else locally where you could get fresh ground, high quality chuck for that price.
As far as the chicken goes, that is a MUCH easier process. I stand, holding the Ziploc open while he tosses in 6-7 big thighs into the bag, then I smash it down in a similar, flat disc fashion, push out as much air as possible, and seal it up.  Doing the chicken in this manner also makes stocking up in the freezer much easier, and makes it a breeze to organize all of the meats that we've stocked up on. You could very easily grind up your chicken to make ground chicken, if that is something you're into, just as quickly and efficiently as we do our ground beef.  The food grinder is amazing.  I've had it and used it for years and it's still going strong without any issues.  There is an upcoming sale on picnic pork roasts and I plan on stocking up on some of those and grinding them up to make my own fresh sausage, which is also delicious and nothing like the store-bought. Any meat you are into that is ground is going to be fabulous and far superior than your local grocers meat.  Trust me.  Once you go home-ground, you never go back.  And not only that but you cannot beat the money savings.  Doing this for my family ensures that we have 3 months worth of meals, at least, in our freezer at all times.  It's so reassuring and also makes things so easy for me shopping wise.  And let's face it, anything that makes shopping with three kids for this stay at home mom easier is good for me!


Thursday, July 12, 2012

No-Bake Chewy Chocolate Chip Granola Bars (Like Quaker, but better!)


My babies LOVE granola bars.  They're like crack for kids.  But they're also highly over-priced for what you get in a little 8 pack box.  That's why granola bars are one of the homemade items that I make on a regular basis here.  And with this recipe, they make up in minutes and last about two weeks.  And even better?  There are no weird additives or funky ingredients in them, so you know exactly what you're feeding your kiddos.  This granola bar recipe is very similar to the Quaker chocolate chip granola bars, but in my opinion, they're tastier and heartier.  Ok, so let's start with what you'll need to make a batch of your own.

No-Bake Chewy Chocolate Chip Granola Bars  (Print Recipe)
(makes 24 bars)

Ingredients
- 1/2 cup unsalted butter
- 1/2 cup pure honey
- 2/3 cup packed brown sugar
- 4 cups quick cooking oats
- 2 cups rice crispies
- 1 teaspoon vanilla
- 1/2 bag milk chocolate chips (or semi-sweet, or white chocolate, or butterscotch, etc. You get   the point)
- Non-stick cooking spray
Directions
In a large bowl, combine the quick oats and rice crispies and toss until combined. Set the mixture to the side and start on the ooey, gooey, sticky part of the granola bars that helps all the ingredients stick together. In a sauce pan on medium-high heat combine the butter, brown sugar and honey.  Heat it until it begins to bubble and then turn the stove down a bit and continue cooking the mixture for 2 minutes. This is a sort of sticky caramel type concoction that is mighty delicious.  Oh, and quick hint: to help the honey pour out easily from your measuring cup, spray a tiny bit of non-stick cooking spray beforehand and when you go to pour the honey into the pot it will slide out effortlessly, without a stitch of trouble! :)

Once the mixture has cooked for two minutes, turn the heat off and add the vanilla, stirring well. After the vanilla is combined with the ooey, gooey deliciousness, pour the mixture into the bowl with the oats and rice crispies and stir together until it's evenly combined. If you're having trouble getting it all mixed together with a spoon or spatula, you can dig in with your hands to get the job done.  This is a good method for when your husband is around and you're into doing little things to keep the flame burning. Simply dig into the warm mixture and then when he walks into the kitchen and asks what you're doing, pull out your hand, lick some of it off of your finger seductively and reply "Saving you money by making sweet sweeeeet homemade granola bars. Want a taste?" and then bat your eyelashes innocently and watch a sly smile spread across his face. Your husband will suddenly become a lover of granola bars, even if he wasn't prior to that moment.  You're welcome. ;)

After the granola is all combined, dump it into a cookie sheet that has been lightly sprayed with non-stick cooking spray. Then spray one hand lightly with the cooking spray, rub both hands together, then use your hands to smash down the mixture into the pan until it is nice and compact.  The more smooshed down the better, as that will help the bars stay together once they've cooled. After the mixture is pressed down well, sprinkle the chocolate chips evenly over the bars and let them sit for a minute or two and then push them down into the granola.  The mixture is still warm, so letting them sit on top a minute or two melts the chocolate just slightly.  That way when you go to push the chocolate chips into the granola, they spread out into the mixture and stick well.  Then when it's cool and the bars are being cut, the chocolate chips stick perfectly into the bars.
I cut the bars after they've cooled and set a bit.  And spreading them into the cookie sheet helps you eyeball and cut out 24 perfectly sized granola bars, just like your kids are used to eating from Mr. Quaker, but better because they're made by Miss Badass, Sexy Baker!  Enjoy!

Wednesday, July 11, 2012

Cran Strawberry Streusel Scones


It's the perfect time of year to add abundant amounts of fresh strawberries into any meal, from desserts to fresh tossed salads.  It's the season for harvesting berries, which means you can get them more affordably, and enjoy them without breaking the bank.  This also means that I go absolutely bat shit crazy when I find the big flats of them on the cheap and I load up like they're going out of style.  Because of this, I always end up with more berries than I can eat before they start  to lose their life and begin to droop.  But I hate to let anything in my kitchen go to waste, so thankfully baked goods are the perfect platform for using up extra berries that would otherwise go bad and be tossed out, or in my case, fed to the chickens.  Which still isn't really considered waste since anything I feed those beeyotches turns into eggs for us!  Hooray, beeyotches, and thanks again!

Many times when I'm putting together a recipe on the fly, it starts out with me trying to put items I have in my kitchen to good use that have been forgotten or are going to spoil soon.  This was the case with my lonesome bag of cranberries and poor, sagging strawberries that sat in the fridge, reminiscing of their younger, perkier days. (I feel you, dear berries, I feel you)  So once I decided on throwing my cranberries and strawberries a "last of your life scone party", I started pulling out all of the ingredients.  And let me tell you, once you have a good base recipe for a scone, you can pretty much throw in any ingredients to create unique and delicious pastries that make you feel like friggin' Martha Stewart, only hotter and with a more colorful vocabulary, like yours truly.  ;oP  Ok, so let's start with the scone ingredients:

Cran Strawberry Streusel Scones (Print Recipe)


Ingredients
- 2 cups all-purpose flour
- 1/3 cup granulated white sugar
- 2 teaspoons baking powder
- 1/4 teaspoon salt
- 6 tablespoons unsalted butter, cut into hunks
- 1/2 pint fresh strawberries, roughly chopped
- 1/2 cup dried cranberries
- 1 large egg, lightly beaten
- 1 teaspoon pure vanilla extract
- 1/2 cup heavy cream (or half and half, or milk)

Streusel Topping
- 1/3 cup brown sugar
- 1/4 cup all purpose flour
- 1/4 cup rolled oats
- 1/2 teaspoon cinnamon
- 2 tablespoons cold, unsalted butter, cut into pieces

Directions
Preheat oven to 400 degrees F and line a cookie sheet with parchment paper, thanking the Lord for it's existence and all of the wonderful ways it helps you out in the kitchen.  Next, in a large bowl, combine all of the ingredients for the streusel mixture and work together with a pastry blender... or two forks, or a food processor, or hell, even your hands.  Whatever method works for you that will result in the mixture resembling coarse crumbs. I can't say enough, though, that if you don't have a pastry blender you should go out immediately and buy one.  Seriously.  It's about ten bucks at most, and worth every penny.  You should see my mad pastry blender skills.  You would be highly impressed and never know that at one time I didn't think it was an important kitchen tool and struggled with my pastry ingredient crumbling method like a drunken caveman with ten thumbs.  Pastry blender.  Buy one. You're welcome.

Set the streusel mixture to the side and begin putting together your scone mixture.  In a large bowl, combine the flour, sugar, baking powder and salt. Cut the cold butter into small chunks and work into the flour mixture with the almighty pastry blender. This mixture should also resemble coarse crumbs.Gently fold the chopped up strawberries and cranberries into the scone mixture and stir until just combined.  You don't want to overmix the scone dough at all, as the more you mess with it the tougher it becomes.  

Transfer the dough to a lightly floured surface and knead gently 4 or 5 times until the dough has just come together and then pat it into either a circle or rectangle that is about 1 1/2 inches thick. Cut the scones into even triangles and then brush the top of the dough with a light coat of the heavy cream. Don't be stingy.  It's a sin to be stingy with heavy cream.  Truth!  After the dough has been moistened, coat the entire top surface with the streusel mixture and pat down lightly to help it stick. Then, carefully lift each scone and place it on the cookie sheet lined with parchment paper.  Make sure the scones aren't touching.  They expand a bit, but not anything ginormous, so just give them an inch or two between one another to puff up.
  

Bake the scones until nicely browned, between 16-22 minutes.  You want your scones to have a bit of delicious crispiness but you don't want them crunchy.  Unless you're the crazy crunchy loving type, but myself personally?  I like a bit of crisp with soft and crumbly on the inside, and this recipe will give you just that.  You will know that your scones are done once a toothpick inserted in the center comes out clean.  After you take them out of the oven you can transfer them to a wire rack to cool, or be like me and shove one in your face immediately because you're impatient and must savor some of the deliciousness asap, even if the soft, melty strawberries do burn the sheeyit out of your tongue, because they're just THAT good.  They really are. So I'd say it's better to give this recipe a try sooner than later.  You won't regret it.


Monday, July 9, 2012

Homemade Paper Fortune Love Note Cookies


The hubbs and I have always appreciated handmade gifts. We're both sentimental romantics at heart. In fact, I think Shnook is more sentimental than I am. He has a very large box that he keeps all of the cards, love letters, little doodles, etc. that I've given him throughout the years and no one is allowed to touch it without losing an arm. Though the longer we've been together, the harder it's gotten to come up with new ideas. When we first started dating, I would put together little tidbits like custom crossword puzzles or love coupons that were traded between the two of us. And one Valentine's Day a few years back when I couldn't eat any type of sugar, Matt bought a heart shaped box of chocolate, emptied it out and in each little slot where the piece of chocolate went he glued a little note saying something as to why he loved me and titled an accompanying love note that said "Sweets for my Sweet". So you can imagine a couple weeks ago when our 12 year wedding anniversary was approaching I wanted to do something special to remind him how much I love and appreciate him and his uncanny ability to put up with me. Because, let's face it, I can be bat shit crazy most times  sometimes, and yet he still loves me anyway. 


The first thing I did to get the creative juices flowing was decide where we were going to eat. We have a favorite teppan grill nearby that makes the most amazing food, so that lead me toward an Asian direction. Then I remembered seeing a tutorial on Pinterest for felt fortune cookies. I knew I didn't want to go the felt route so I started searching for paper fortune cookies and sure enough I found this simple paper fortune cookie tutorial rather quickly. Easy peasy! For the fortune cookies, the list of supplies is super simple: 


-Paper for the "cookies" 
-Printed fortunes (I made mine on the computer, then printed and cut them out) 
-Scissors 
-Glue 


We have been married for 12 years so I wanted to make 12 cookies with individual fortunes that said a reason why I loved my Shnook. Each fortune was formatted like so: 


I am fortunate because... 
       You are the best snuggler ever


I made 12 seperate fortunes, printed them on a sheet of paper and then cut them out freehand.  Then I dug through my scrapbooking paper and found some simple, tan abstract paper that resembled the look of a fortune cookie and followed the tutorial I found online.  It was seriously easy.  The hardest part was having the patience it took to hold each paper cookie long enough for the glue to set before I moved on to my next cookie.


Once I finished all of the cookies, I stuffed each one with a fortune and then piled the cookies into a chinese take out box.  Then I cut out a cute label that I attached to the box that said "Thank you for the 12 years of fortune" and added a contrasting bow.  Super simple yet super cute. I gave the hubbs my gift after dinner, when it was perfect timing and he loved it.  It cost nearly nothing to make yet was "worth a fortune" sentiment wise. ;) The only thing that was able to top his box of cookies was the big red bow that adorned my neck...with nothing else, later that evening.  Cookies and nookie.  What couple can complain about that on an anniversary night?


Free Blog Template by June Lily